Using the CCIP local simulator in Remix IDE
In this guide, you will test the Chainlink CCIP getting started guide locally in Remix IDE. You will:
- Deploy a CCIP sender contract
- Deploy a CCIP receiver contract
- Use the local simulator to send data from the sender contract to the receiver contract
Prerequisites
Remix IDE is an online development environment that allows you to write, deploy, and test smart contracts. By default Remix IDE does not persist the files that you open from an external source. To save files, you will need to manually create a workspace and copy the files into the workspace.
-
Open the Remix IDE in your browser.
-
Create a new workspace.
-
Copy the content of the Test CCIP Local Simulator contract into a new file in the workspace.
// SPDX-License-Identifier: MIT pragma solidity 0.8.24; // solhint-disable no-unused-import import {CCIPLocalSimulator} from "@chainlink/local/src/ccip/CCIPLocalSimulator.sol"; -
Copy the content of the Sender contract into a new file in the workspace.
// SPDX-License-Identifier: MIT pragma solidity 0.8.24; import {IRouterClient} from "@chainlink/contracts-ccip/src/v0.8/ccip/interfaces/IRouterClient.sol"; import {OwnerIsCreator} from "@chainlink/contracts-ccip/src/v0.8/shared/access/OwnerIsCreator.sol"; import {Client} from "@chainlink/contracts-ccip/src/v0.8/ccip/libraries/Client.sol"; import {LinkTokenInterface} from "@chainlink/contracts/src/v0.8/shared/interfaces/LinkTokenInterface.sol"; /** * THIS IS AN EXAMPLE CONTRACT THAT USES HARDCODED VALUES FOR CLARITY. * THIS IS AN EXAMPLE CONTRACT THAT USES UN-AUDITED CODE. * DO NOT USE THIS CODE IN PRODUCTION. */ /// @title - A simple contract for sending string data across chains. contract Sender is OwnerIsCreator { // Custom errors to provide more descriptive revert messages. error NotEnoughBalance(uint256 currentBalance, uint256 calculatedFees); // Used to make sure contract has enough balance. // Event emitted when a message is sent to another chain. event MessageSent( bytes32 indexed messageId, // The unique ID of the CCIP message. uint64 indexed destinationChainSelector, // The chain selector of the destination chain. address receiver, // The address of the receiver on the destination chain. string text, // The text being sent. address feeToken, // the token address used to pay CCIP fees. uint256 fees // The fees paid for sending the CCIP message. ); IRouterClient private s_router; LinkTokenInterface private s_linkToken; /// @notice Constructor initializes the contract with the router address. /// @param _router The address of the router contract. /// @param _link The address of the link contract. constructor(address _router, address _link) { s_router = IRouterClient(_router); s_linkToken = LinkTokenInterface(_link); } /// @notice Sends data to receiver on the destination chain. /// @dev Assumes your contract has sufficient LINK. /// @param destinationChainSelector The identifier (aka selector) for the destination blockchain. /// @param receiver The address of the recipient on the destination blockchain. /// @param text The string text to be sent. /// @return messageId The ID of the message that was sent. function sendMessage( uint64 destinationChainSelector, address receiver, string calldata text ) external onlyOwner returns (bytes32 messageId) { // Create an EVM2AnyMessage struct in memory with necessary information for sending a cross-chain message Client.EVM2AnyMessage memory evm2AnyMessage = Client.EVM2AnyMessage({ receiver: abi.encode(receiver), // ABI-encoded receiver address data: abi.encode(text), // ABI-encoded string tokenAmounts: new Client.EVMTokenAmount[](0), // Empty array indicating no tokens are being sent extraArgs: Client._argsToBytes( // Additional arguments, setting gas limit and allowing out-of-order execution. // Best Practice: For simplicity, the values are hardcoded. It is advisable to use a more dynamic approach // where you set the extra arguments off-chain. This allows adaptation depending on the lanes, messages, // and ensures compatibility with future CCIP upgrades. Read more about it here: https://docs.chain.link/ccip/best-practices#using-extraargs Client.EVMExtraArgsV2({ gasLimit: 200_000, // Gas limit for the callback on the destination chain allowOutOfOrderExecution: true // Allows the message to be executed out of order relative to other messages from the same sender }) ), // Set the feeToken address, indicating LINK will be used for fees feeToken: address(s_linkToken) }); // Get the fee required to send the message uint256 fees = s_router.getFee( destinationChainSelector, evm2AnyMessage ); if (fees > s_linkToken.balanceOf(address(this))) revert NotEnoughBalance(s_linkToken.balanceOf(address(this)), fees); // approve the Router to transfer LINK tokens on contract's behalf. It will spend the fees in LINK s_linkToken.approve(address(s_router), fees); // Send the message through the router and store the returned message ID messageId = s_router.ccipSend(destinationChainSelector, evm2AnyMessage); // Emit an event with message details emit MessageSent( messageId, destinationChainSelector, receiver, text, address(s_linkToken), fees ); // Return the message ID return messageId; } } -
Copy the content of the Receiver contract into a new file in the workspace.
// SPDX-License-Identifier: MIT
pragma solidity 0.8.24;

import {Client} from "@chainlink/contracts-ccip/src/v0.8/ccip/libraries/Client.sol";
import {CCIPReceiver} from "@chainlink/contracts-ccip/src/v0.8/ccip/applications/CCIPReceiver.sol";

/**
 * THIS IS AN EXAMPLE CONTRACT THAT USES HARDCODED VALUES FOR CLARITY.
 * THIS IS AN EXAMPLE CONTRACT THAT USES UN-AUDITED CODE.
 * DO NOT USE THIS CODE IN PRODUCTION.
 */

/// @title - A simple contract for receiving string data across chains.
contract Receiver is CCIPReceiver {
    // Event emitted when a message is received from another chain.
    event MessageReceived(
        bytes32 indexed messageId, // The unique ID of the message.
        uint64 indexed sourceChainSelector, // The chain selector of the source chain.
        address sender, // The address of the sender from the source chain.
        string text // The text that was received.
    );

    bytes32 private s_lastReceivedMessageId; // Store the last received messageId.
    string private s_lastReceivedText; // Store the last received text.

    /// @notice Constructor initializes the contract with the router address.
    /// @param router The address of the router contract.
    constructor(address router) CCIPReceiver(router) {}

    /// handle a received message
    function _ccipReceive(
        Client.Any2EVMMessage memory any2EvmMessage
    ) internal override {
        s_lastReceivedMessageId = any2EvmMessage.messageId; // fetch the messageId
        s_lastReceivedText = abi.decode(any2EvmMessage.data, (string)); // abi-decoding of the sent text

        emit MessageReceived(
            any2EvmMessage.messageId,
            any2EvmMessage.sourceChainSelector, // fetch the source chain identifier (aka selector)
            abi.decode(any2EvmMessage.sender, (address)), // abi-decoding of the sender address,
            abi.decode(any2EvmMessage.data, (string))
        );
    }

    /// @notice Fetches the details of the last received message.
    /// @return messageId The ID of the last received message.
    /// @return text The last received text.
    function getLastReceivedMessageDetails()
        external
        view
        returns (bytes32 messageId, string memory text)
    {
        return (s_lastReceivedMessageId, s_lastReceivedText);
    }
}
At this point, you should have three files in your workspace:
-
TestCCIPLocalSimulator.sol: The file imports the Chainlink CCIP local simulator contract.
-
Sender.sol: The file contains the Sender contract that interacts with CCIP to send data to the Receiver contract.
-
Receiver.sol: The file contains the Receiver contract that receives data from the Sender contract.
Deploy the contracts
-
Compile the contracts.
-
Under the Deploy & Run Transactions tab, make sure Remix VM is selected in the Environment drop-down list. Remix will use a sandbox blockchain in the browser to deploy the contracts.
-
Deploy the CCIP local simulator:
-
Select the
TestCCIPLocalSimulator.solfile in the file explorer. -
In the Contract drop-down list, select
CCIPLocalSimulator. -
Click the Deploy button.
-
The
CCIPLocalSimulatoris shown in the Deployed Contracts section. -
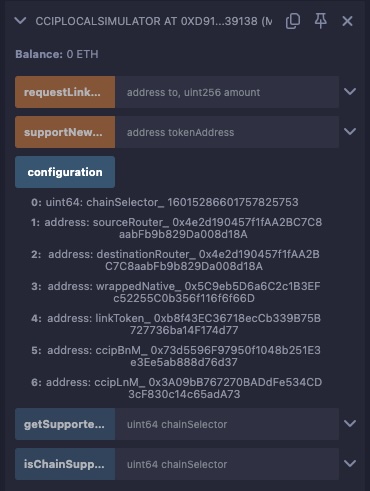
In the list of functions, click the
configurationfunction to retrieve the configuration details for the pre-deployed contracts and services needed for local CCIP simulations:
-
-
You will interact with the LINK token contract to fund the sender contract with LINK tokens. The LINK token contract is pre-deployed in the local simulator configuration, so you can simply load the LINK token contract instance:
- Select
LinkTokenin the Contract drop-down list. - Fill in the At Address field with the address of the
LINKtoken contract from theCCIPLocalSimulatorconfiguration. - Click the At Address button.
The
LinkTokencontract is shown in the Deployed Contracts section. - Select
-
Deploy the
Sender.solcontract:- Select the
Sender.solfile in the file explorer. - In the Contract drop-down list, select
Sender. - Under the Deploy section, fill in the constructor parameters:
_router: The address of thesourceRoutercontract from theCCIPLocalSimulatorconfiguration._link: The address of theLINKtoken contract from theCCIPLocalSimulatorconfiguration.
- Click the Deploy button.
The
Sendercontract is shown in the Deployed Contracts section. - Select the
-
Deploy the
Receiver.solcontract:- Select the
Receiver.solfile in the file explorer. - In the Contract drop-down list, select
Receiver. - Under the Deploy section, fill in the constructor parameters:
_router: The address of thedestinationRoutercontract from theCCIPLocalSimulatorconfiguration.
- Click the Deploy button.
The
Receivercontract is shown in the Deployed Contracts section. - Select the
Transfer data from the sender to the receiver
-
Fund the sender contract with LINK tokens to pay for CCIP fees:
- Copy the address of the
Sendercontract from the Deployed Contracts section. - In the
CCIPLocalSimulatorcontract, fill in therequestLINKFromFaucetfunction with the following inputs:to: The address of theSendercontract.amount: The amount of LINK tokens to transfer. For instance:1000000000000000000.
- Click the Transact button.
- Copy the address of the
-
Send data from the sender contract to the receiver contract:
-
Copy the address of the
Receivercontract from the Deployed Contracts section. -
In the
Sendercontract, fill in thesendMessagefunction with:destinationChainSelector: The destination chain selector. You can find it in theCCIPLocalSimulatorconfiguration.receiver: The address of theReceivercontract.text: The text to send. For instanceHello!.
-
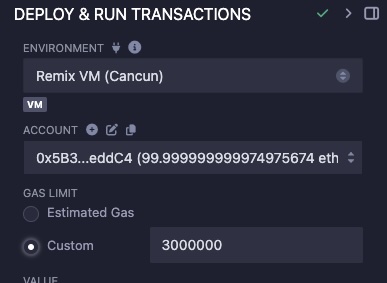
Remix IDE fails to estimate the gas properly for the
sendMessagefunction. To work around this, you need to set the gas limit manually to3000000:
-
Click the Transact button.
-
-
Check the receiver contract to verify the data transfer:
-
In the
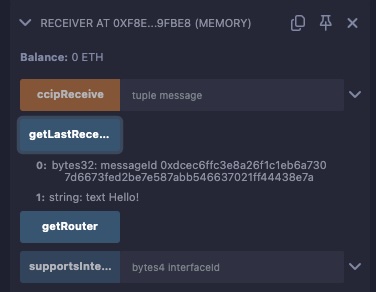
Receivercontract, click on thegetLastReceivedMessageDetailsfunction. -
The
getLastReceivedMessageDetailsfunction returns the text sent from theSendercontract:
-
Next steps
You have successfully tested the CCIP getting started guide within a few minutes using Remix IDE. Testing locally is useful to debug your contracts and fix any issues before testing them on testnets, saving you time and resources. As an exercise, you can try any of the CCIP guides using the local simulator in Remix IDE.